So these shop-build stories have got to stop. Really they do. My wife has a list of stuff she wants to either buy or for me to build. I keep saying I’m going to build them, but… Alas, another season in the shop is coming to a close and they’re not done.
But the dust collector is sorta working and the table saw now has a new fence system.
Don’t get me wrong, the old fence system that came with the saw worked well; certainly better than my Dad’s fence. Still, it had its faults:
- It wasn’t really as straight as one could want. Granted, there was an adjustment for that, but it was forever getting slightly out.
- It wasn’t very tall or long. Couple that with #1 and I finally built an extension that made it larger, straighter, and taller. That worked okay, but it was a big heavy inconvenient thing. It met its end in a tragic accident involving tomatoes; we don’t go into that here.
- The back side of the fence had adjustment knobs on it, making it impossible to use on the left side of the blade. The rail extended in that direction and even had markings for it. As I understand it, the theory was that you’d be able to take 20 minutes out of your day to reconfigure the the fence for that sort of operation.
- What made the above really annoying was that I also have a router table on the right of my saw, and a special router fence that I could clamp on to the fence. That guy then always had to face towards the sawblade, so doing a router operation with the fence always involved a bit of a reach. Hm. It’s hard to explain. No worries, it’ll make itself clear later.
- The original fence is a two-rail system, with a tube in the front and a piece of angle-iron in the back that the fence had to hook onto. That meant putting the fence on always required some fiddling & finagling. Plus it made my outfeed table have to sit a good couple inches away from the table itself, and that gap was a constant source of chafing.
None of those things were really fatal. I mean I could get by with all that, but then, the fates intervened.
At the Root Of It All: YouTube
This spring I sent my Dad a link to the YouTube channel of Allen Little, aka “Ask Woodman”. After watching a few videos of the T-Square fence Allen sells through his company, Very Super Cool Tools, my Dad ordered one. My Dad’s saw is decent, in most respects, but the fence has always been a very sore point, and this seemed to be the way to sort things out.
I’m not exactly sure how it all came to pass, but after he got his installed, I decided I had to have one too. My Dad offered to help me build it while he was here on his annual cross-country pilgrimage to our place. Over the summer we gathered all the components we’d need. Amazingly, we were only short by two hex bolts.
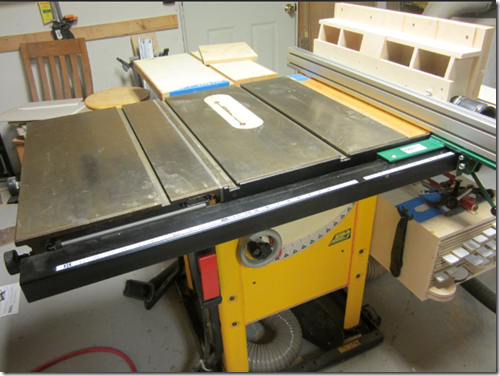
Here’s how it turned out:
As I said, the original saw didn’t have a Biesemeyer fence system. It was a two-rail system (front & back) with a tube in the front. The VSCT fence relies on a Biesemeyer design, so we had to tear everything off the front of the saw and hang new 3×3 angle iron and a 3×2 tube. All that is detailed on the VSCT site and on several YouTube videos.
Dad & I spent a full Saturday making all this happen. It wasn’t easy, but it should be said that I’ve done almost no metalwork and my Dad’s not done much more. The knowhow we got came from two places – my Dad’s very experienced neighbor and AskWoodman’s videos.
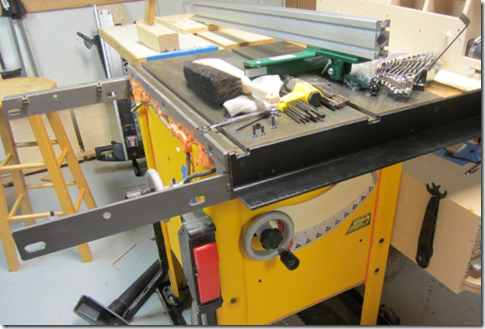
The only trouble we had came from the way the old saw mounted the sliding table. Here’s what the saw looked like with the fence tube and the sliding table off, so you can see what we were up against:
It’s just another steel bar. Fortunately, it just fits flush to the front of the saw, so all we needed to do was drill & tap a couple more bolts to hold that bar to the angle-iron. The only trouble we had there was that the holes needed to be very near to the angle itself, so we had to tap the angle-iron and through-bolt the bar.
We had some adventures coming to that conclusion, but here it is, bolted on there. You can’t hardly tell because the holes are pretty small. (Keen-eyed readers will see evidence of our early failures on the left side of the angle-iron).
I chose to paint it black, mainly out of respect for Dewalt’s colors. That had the added bonus of making the screws that connect the angle-iron to the saw practically invisible.
How Awesome Is That?
Pretty awesome. Yup. Pretty awesome. The fence knocks off all five of my complaints with the original. The Aluminum extrusion is dead straight, dead vertical, moves easily, and works as well on one side of the fence as the other.
There were casualties. If you looked at the first picture and were puzzled about how that sliding table would work with the new fence, well, here’s your answer: it doesn’t really work well anymore, as I effectively removed half its travel. I could have cut some holes in the fence, shortened it up a bit, and all that and made the sliding table work. Allen also details a way to build a bolt-on extension to the rail, which could work.
But I see no point to doing that. The new fence is goodness, and the sliding table is pure fail. It seemed like a good idea when I bought it, but what you want is a proper table saw sled. Here’s William Ng’s video for making one. That’s what you want; the sled on the saw is never going to equal that. So there’s no sense throwing good money after bad, and I’m not going to sacrifice anything on my new fence to make that table function.
The only question I’ve got is where am I going to put the sleds? I’ve got a big 4’ one for ripping, a small one for dados, and I seem to need one like William made there for precision crosscuts. I’ve got designs on making a way to store them underneath the sliding table.
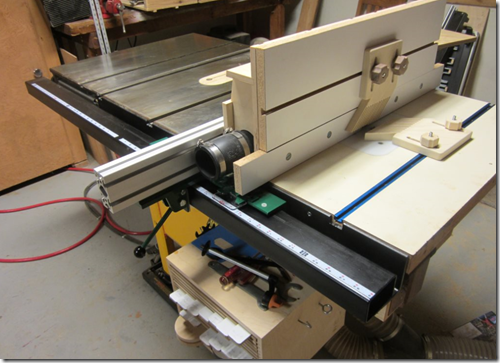
But again, getting back to the awesome, here’s the router fence, attached to the back side, making it so that I can much more comfortably work with the router.
Now, imagine if I had to put the router fence on the other side of the table saw fence – because that’s what I had to do before this. Now I’ve got easy access to both the front and back side of the cut, whereas before I could only reach one side. Also, the power switch is right in front of me, all the time, which adds another element of safety.
By the way, here’s a link to the sketchup plans for the router fence attachment. I deviated from the design a bit, mostly for the worst. The only real win was using some High Molecular Weight Plastic for runners to make the fence slide across the table easier.
Squawk List
There are a few things that weren’t quite right, out of the box:
- It comes with some High Molecular Weight Plastic glides. That’s win. But they’re cut perfectly square, which means they catch like crazy on my miter slots, T-Tracks, and whatever else. I rounded over the runners with my block plane and that settled that. They should be shipped that way.
- The piece of plastic for reading the distance to between the saw blade and the fence seems to sit too high – too much distance between the tape and the bottom of the plastic. In my case it’s the better part of a quarter inch out. I think I can rig it to have a tighter clearance. Perhaps I’m making a big deal out of nothing.
- There’s only one of those things. I need a separate one for left-of-blade operations. In fact, I’m considering going for three – one for the router fence.
All In All…
It’s a good fence. I had fun building it and it’s definitely satisfying to build a tool that you’re going to use. I definitely enjoyed working with metal, but I don’t think I want to do too much of that kind of thing, as it makes a hellabad mess.
I think, all in all, that I should have gone with DeWalt yellow, rather than DeWalt black. Yellow would have disguised the sawdust better.


Excellent job and I appreciate your expertise with the written word.