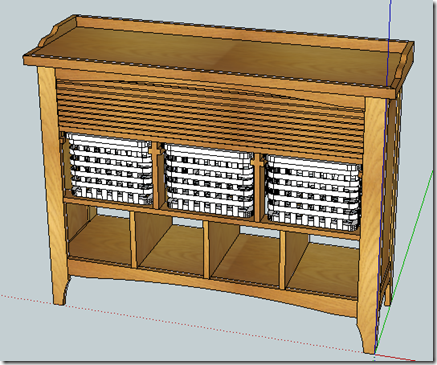
So all this madness started with my wife suggesting a little thing like this for our entry hall – with cubbies for shoes, baskets for mittens and hats and whatnot, and a shelf for who knows what else, and a top shelf to stack up whatever other stuff we’re too lazy to put away.
The carcass is a pretty simple thing. I could make that with my eyes closed. So… Just to add some drama, I decided to have a go at making the baskets myself. My first drawings were pretty simple affairs, but then I decided I could do a little bit of bending.
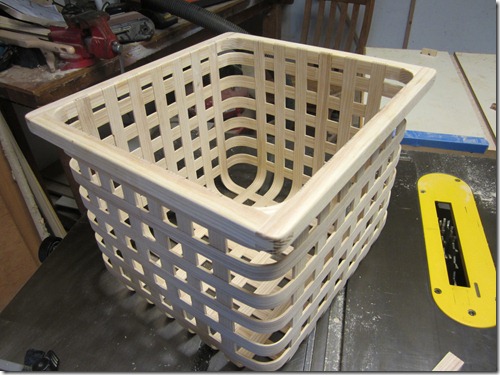
Next thing you know it was a lot of bending:
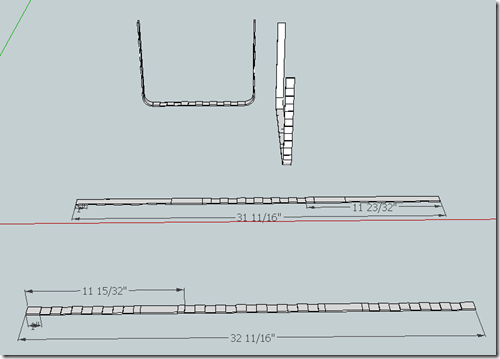
But the trickiness is not just doing the bending, but because I decided to use lap-joints throughout, it had to be bent just so. Here’s the shapes in Sketchup, in the natural shape and stretched flat.
The lap joints allow for no slack. None. Zip. No mistakes or you’re whacking away with the chisel. Wood doesn’t much like tolerances of that sort, especially wood that gets very wet. The lessons learned from the first one were many, for starters, there’s how you cut the strips:
Lessons Learned from Cutting the Strips
Stickering – The nastiest surprise was length. I don’t understand how this happened, but I took a nice straight-grained board with no knots, cut it square and to length, and planed it to a precise thickness, cut it to strips, then ran it through my planer down to 1/8”. Then I found that the strips weren’t the same length as the board they came from. My understanding of wood is that’s just not possible, but it happened. Even before soaking. Sure, it was a delta of less than a 16th of an inch, maybe even less than a 32nd of an inch, but it mattered. So, next time, I’ll cut the source board long and trim the strips after.
Cut the Laps Wide – I cut the lap joints so that, with the wood dry, there was just a hint of play with most of the joints. However, after the wood was soaked, bent, and dried for a week or two, the boards were still a 32nd of an inch or so wider than when I cut them, and thus didn’t fit in the lap without a whole lot of persuasion. Next time, one more shim in the dado set. I suppose there’s a risk that the wood will shrink over time and open up the joint a little, but given that the wood is only 1/16th of an inch, I think it’ll most likely just stretch out and not open the joint. Time will tell.
Painters Tape rocks – I had all sorts of goofy schemes for making sure that all the strips turned out with the grooves cut the same, but what worked was this: I took all the strips of the same kind and taped them together, flat, so I could run the whole batch through in one go. That ensured that all the pieces were absolutely in alignment, plus I had time to carefully check each and every cut. Also, when running this flat through, I could put a small scrap of plywood down right over the blade path to ensure I had even pressure and hence an even depth of cut across all the pieces.
Bending
This was my first go at bending wood. I looked at a lot of techniques, and Hot Pipe Bending seemed like the technique to try. But I gotta be me. So looking at that, I figured I didn’t really have a hot pipe laying around. But I had my wife’s clothes iron. It gets hot; steam shoots out of it and that’s got to be a good thing.
Sure enough, it works. For some reason – maybe the iron isn’t as hot as the hot pipe or maybe because of the kiln-dried wood, my boards wanted to spring back right away after I bent them. But, if I left them in the form for a day or more, the springback was negligible.
So the lessons here were:
Soak for 24 hours or more – I found that without that thorough soaking, the board just won’t bend right. My pieces were 1/8” of an inch thick, and it really seemed to need that whole day to soak. Temperature likely plays a role in how long it needs to sit. Mine was averaging about 65 degrees, I’d guess. If you don’t soak long enough, the symptom is that it’s harder than it should be to bend and it splits easy.
The videos I saw on hot pipe bending all show this phenomenon of the wood just going a bit soft after the heat soaked in. That’s exactly how it felt to me.
Press the Iron to the mold – I found I got a lot less fraying and splitting when I made sure that the iron was pressing against the part of the wood that was being bent. I keep watching the steam bending videos and wonder why they didn’t have trouble with that. Before I figured out about the soaking and this trick, I had occasional problems with fraying around the outside of the bends, but once I got these two tricks together, it’d only fray when I goofed.
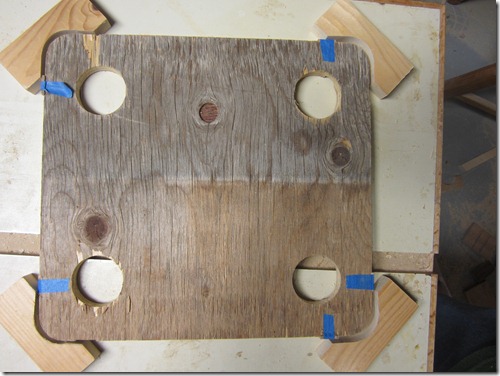
Precisely place the wood on the mold – Here’s the mold I used for all the parts (or rather, one of six practically identical molds). The plywood is cut to the shape of a horizontal slice, so it’ll work for the outer rings as well as the front-back and side-to-side U pieces:
The tape is used to hold some little blocks of wood that mate with the lap joints in the slats. Now, you’d think this would all be easy, but again, with wood movement, weird things seem to happen. But somehow, with the right amount of hammering and swearing, I was able to get things to line up right, even on the circle pieces.
The full procedure was to clamp my plywood form to the workbench vertically, then carefully mount the wet strip on the form and clamp it down, then heat it with the iron for a while, bend it, then temporarily clamp the strip in place after it was bent, then jam the edge clamp blocks on and clamp it tight. The clothes iron only works well if it’s horizontal, so I had to spin the whole arrangement to get all four corners (for the circular bands anyway).
Scorch/Smorch – One of the guys in the videos for steam bending spent time worrying about keeping his wood from drying out from the iron because he was seeing scorching. Ash, the wood I chose, is kindof famous for scorching, but I never saw a hint of it. I started off trying to be careful of that, but very quickly learned I didn’t need to hassle with it. I’d guess it’s because the clothes iron doesn’t get as hot as the pipe with the torch in it.
Air-Dried/Schmair Dried – The guidance is to use air dried wood. I didn’t have any of that, but I figured I’d give it a shot anyway. I don’t know if things would have gone better with air dried wood, but it works alright with what I had.
Let it Sit – I found that I got acceptably little springback after a day in the form. Even less after 3 days. Again, weather probably plays a role here, and I was at 65 degrees with low humidity.
This is No Way To Run A Railroad – I’d guess it took me fully 15 minutes per bend, what with all the fussing with the bending and the forms and etc. Plus I only have so many forms which limited how fast I could make these things. I need a better plan if I’m going to make 2 or 3 more of these things.
Finishing
I haven’t actually gotten near to finishing it yet, so these are just ideas at the moment, but…
Dying while soaking – Colorants are usually pretty shallow, and with a hard wood like Ash, that’s especially true. One scrape and raw wood’s showing. I’ve been considering the idea of putting some dye in the mix while the wood is soaking. I don’t think I’ll actually do it, but it’s an interesting idea. Particularly if I only dyed some of the pieces.
Spraying the finish – Truly, with a piece like this, spraying is the only way to finish it and stay sane. I suppose this is my excuse to get a HVLP system.
All In All
So it’s a lot of work. I wish the project was a little cooler than just a basket. I really like the effect of the bent wood. Bent wood is something I like because when people look at it, there’s that “How’d you do that??” look. I’m glad I learned the process; I just need to find something fun to apply it to…


Leave a comment